Automation Cards in Reflys
A card is a multimedia block that can be used in Reflys automations to present visual information and initiate an action. A card usually contains
- Image
- Title
- Subtitle (optional)
- One or more buttons, up to 3 (e.g., open a link, move to the next step)
You can add a card to any trigger in Instagram and Messenger and also combine it with other blocks: Message, Delay, Text, Data Collection, Video, Audio, and Products. This guide takes you step-by-step from your first click to publishing and testing.
- Cards can be used in flows triggered by any Instagram or Messenger channel (e.g., Keyword Trigger, Story Reply, Post Comment, Inbox DM, etc.).
- It is possible to edit each card individually, making it easy to speed up building similar layouts.
Before You Start
- Make sure you are logged in with your Reflys account.
- Make sure that you have at least one connected channel (Instagram or Messenger).
- Choose what content should be displayed (an image, title, or subtitle) and the button actions (e.g., a URL to open or jumping to another step in the flow).
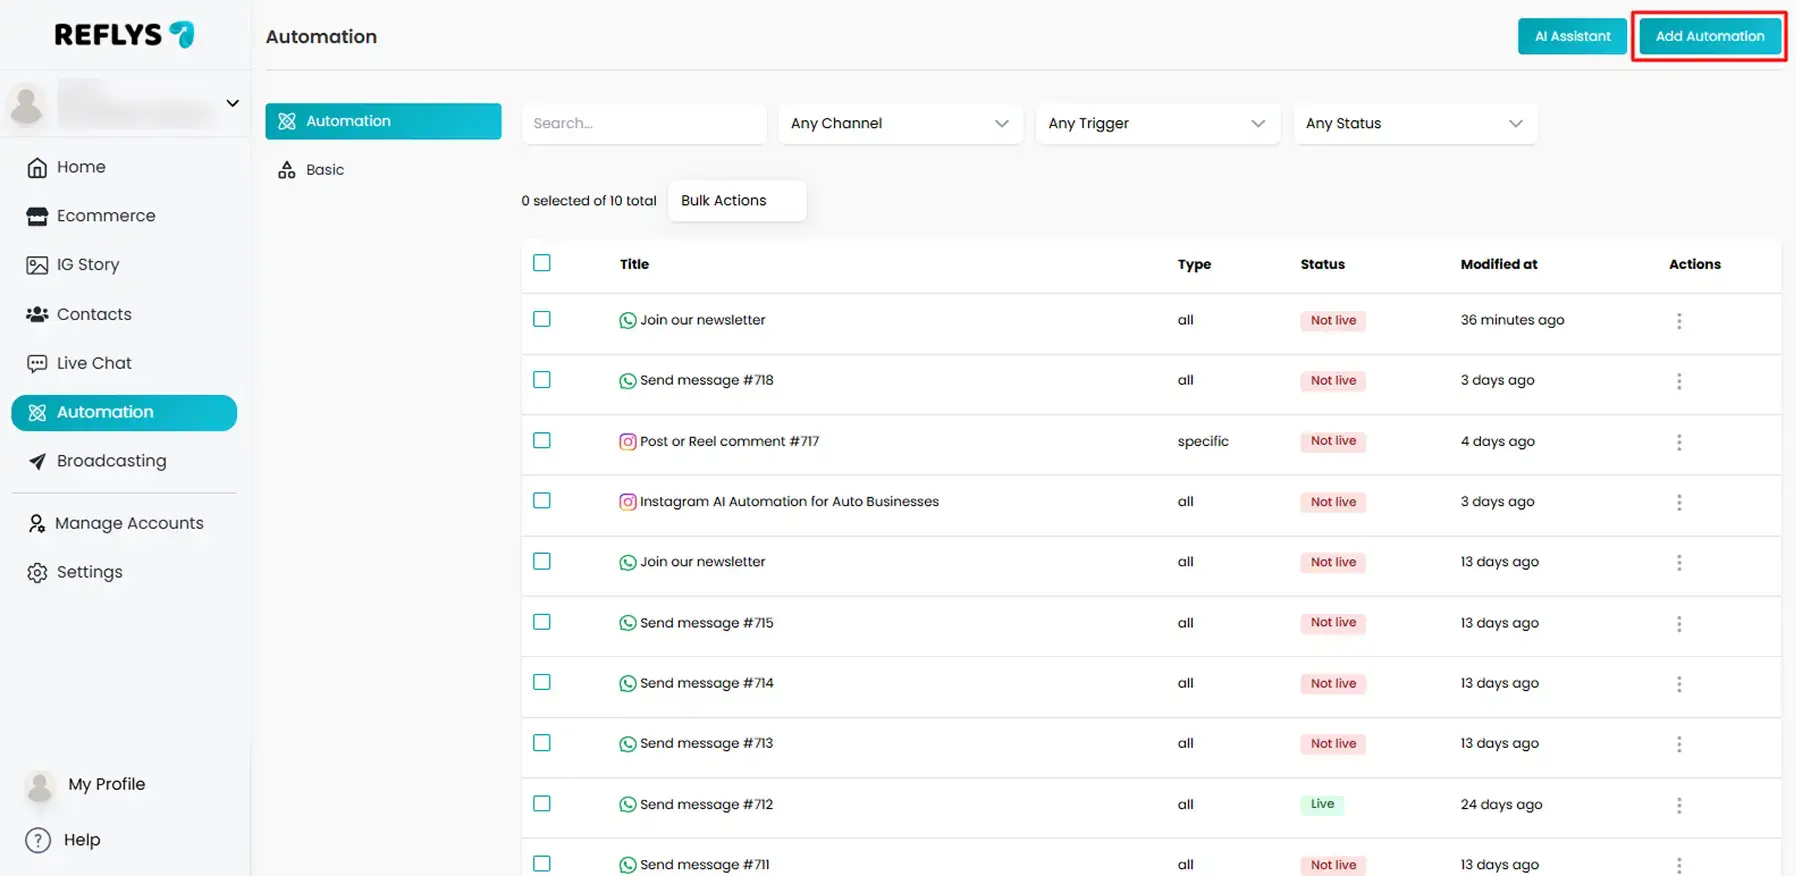
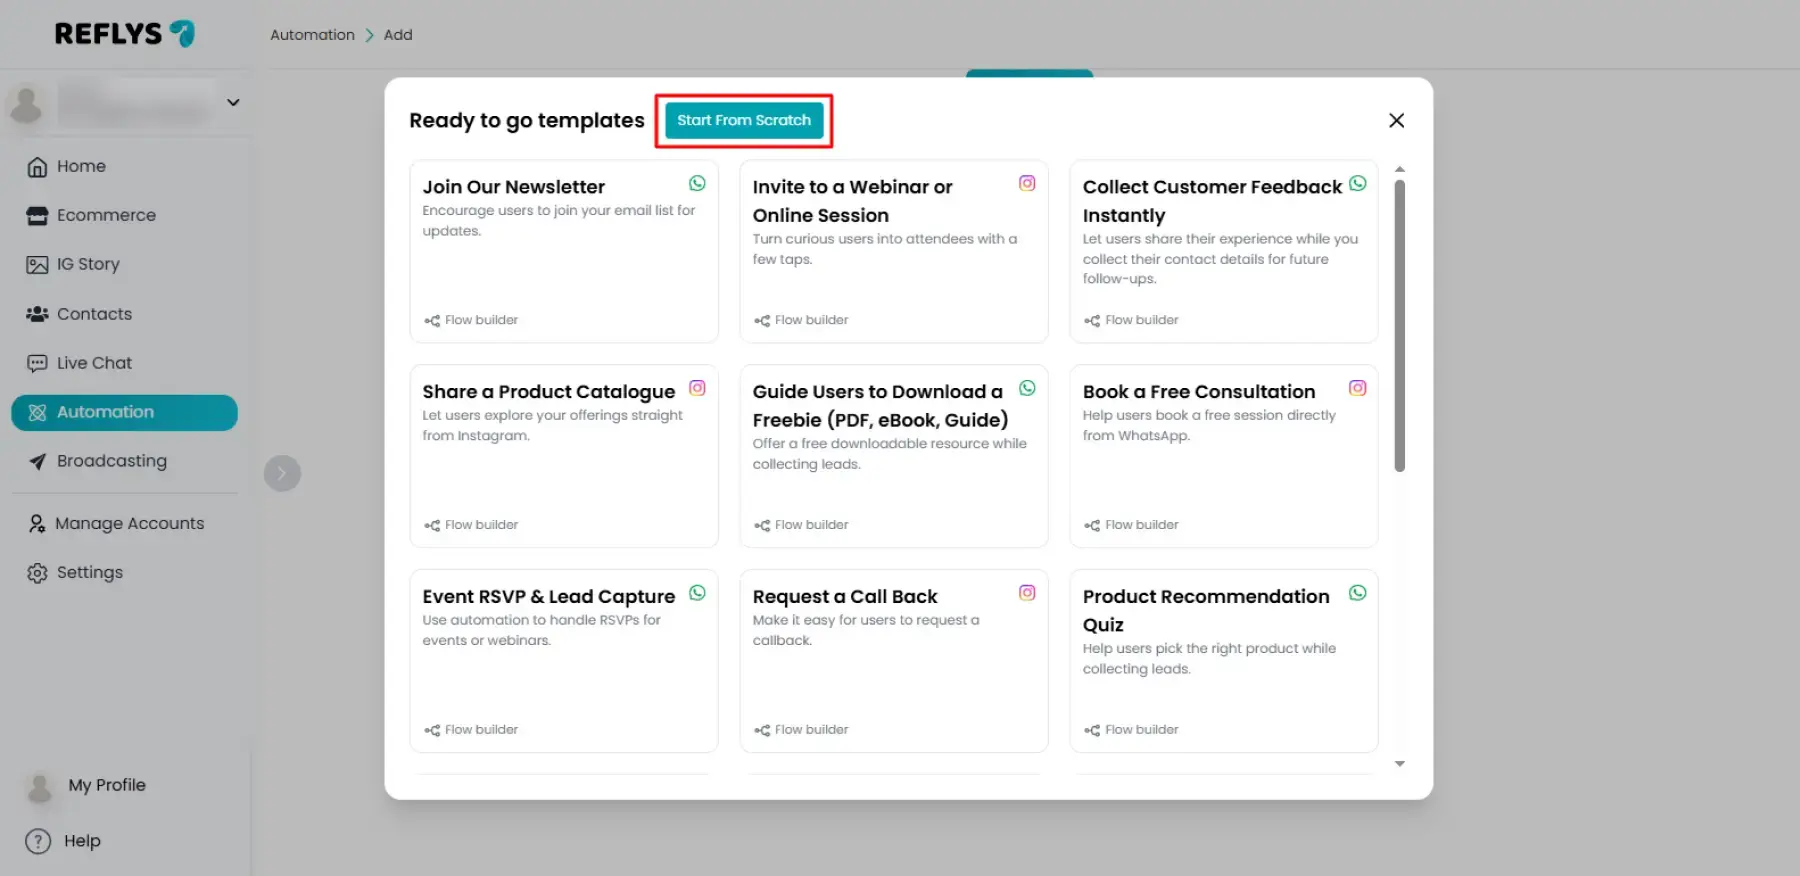
Step 1: In Reflys Dashboard, go to Automations → Add Automation
- Click Add Automations > Start from Scratch
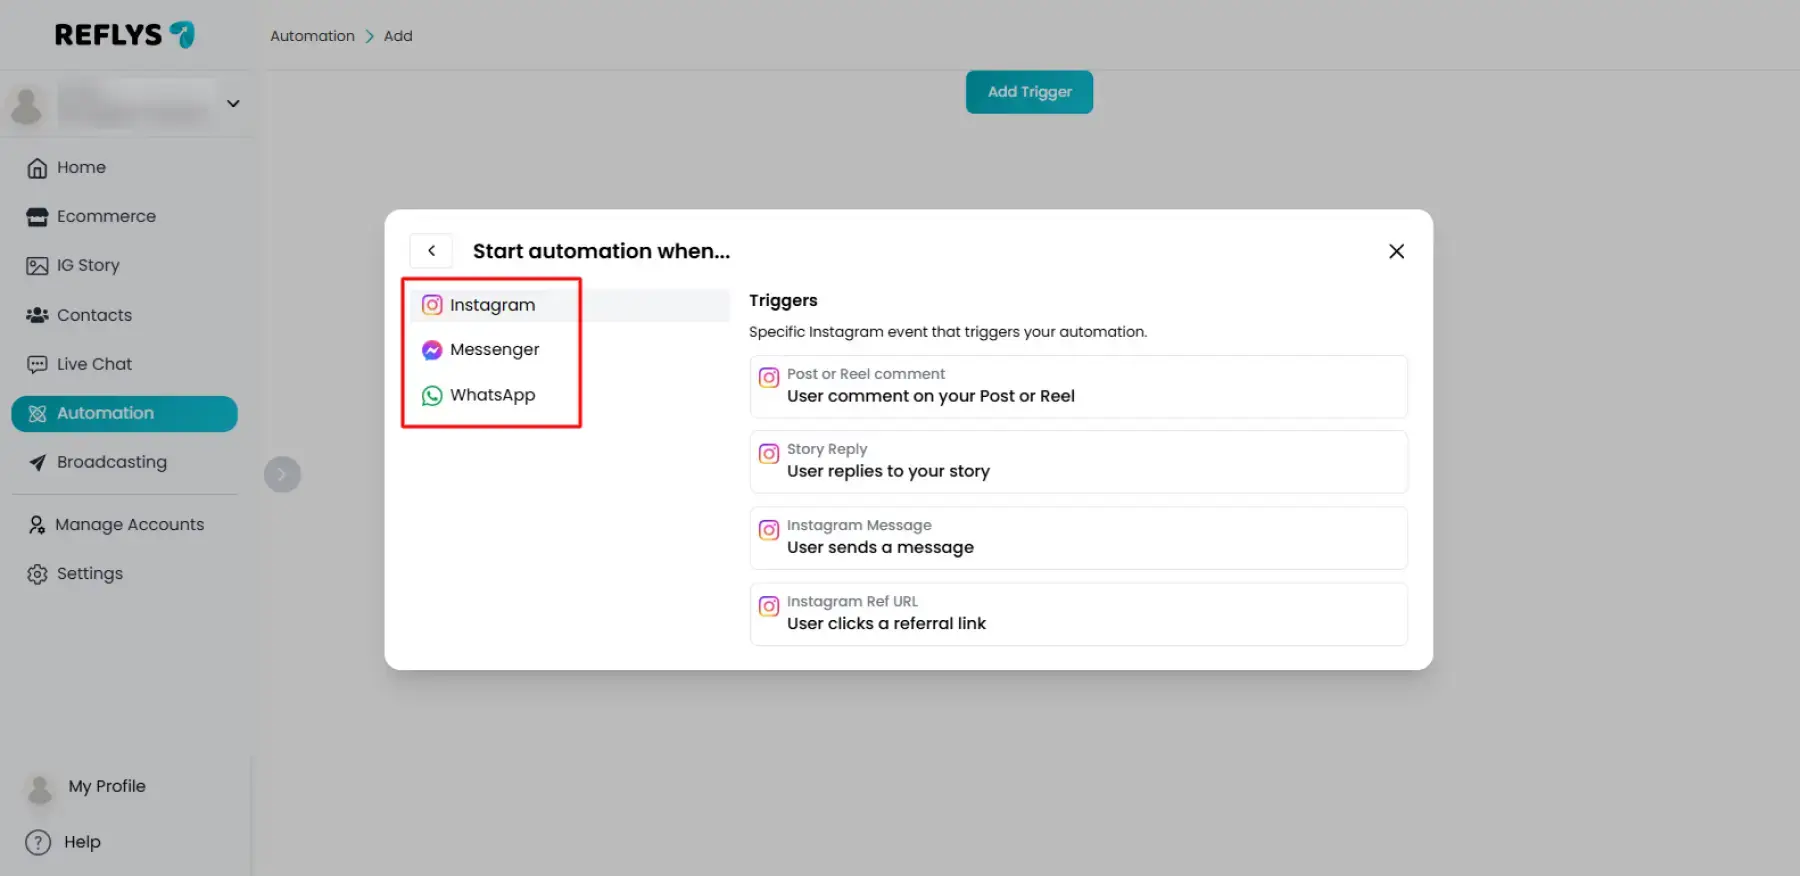
Step 2: Select Channel
Open Channels and choose a trigger within Instagram or Messenger and ensure it is connected.
Step 3: Create a Flow from a Trigger
Cards can be added to any Instagram or Messenger trigger. Common examples:
- Instagram: Keyword Trigger, Story Reply Trigger, Comment Trigger, DM Trigger, Clicks a Referral Link
Messenger: Keyword Trigger, Post Comment Trigger, Inbox Trigger, Clicks a Referral Link - Choose an automation trigger to create a flow.
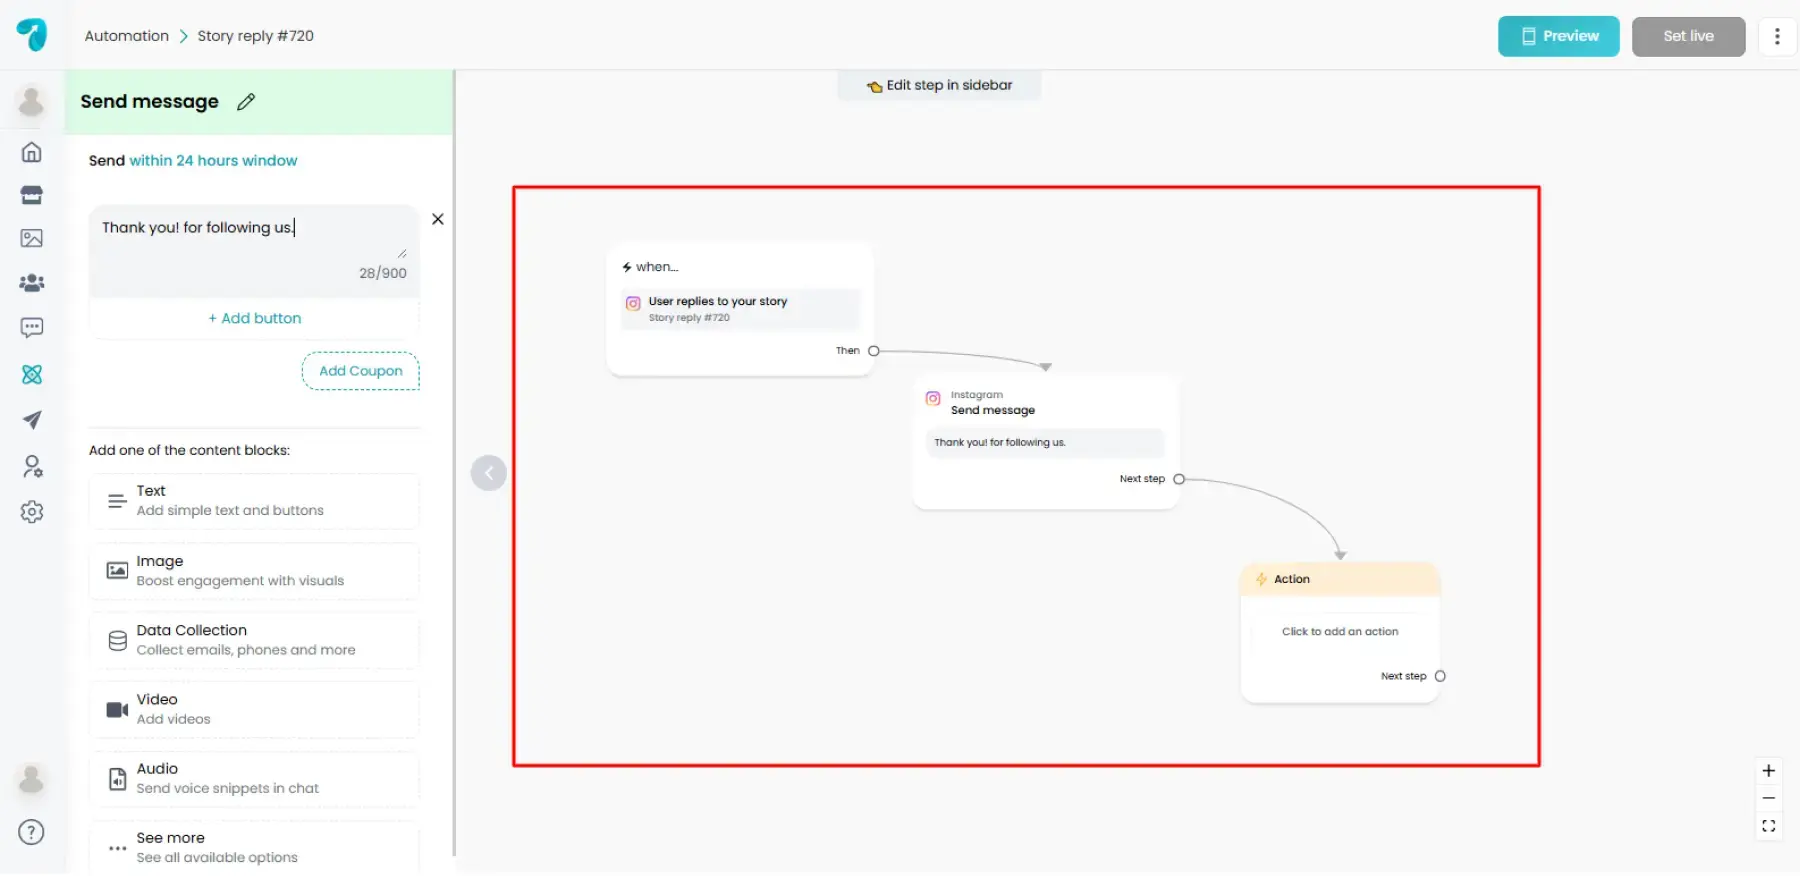
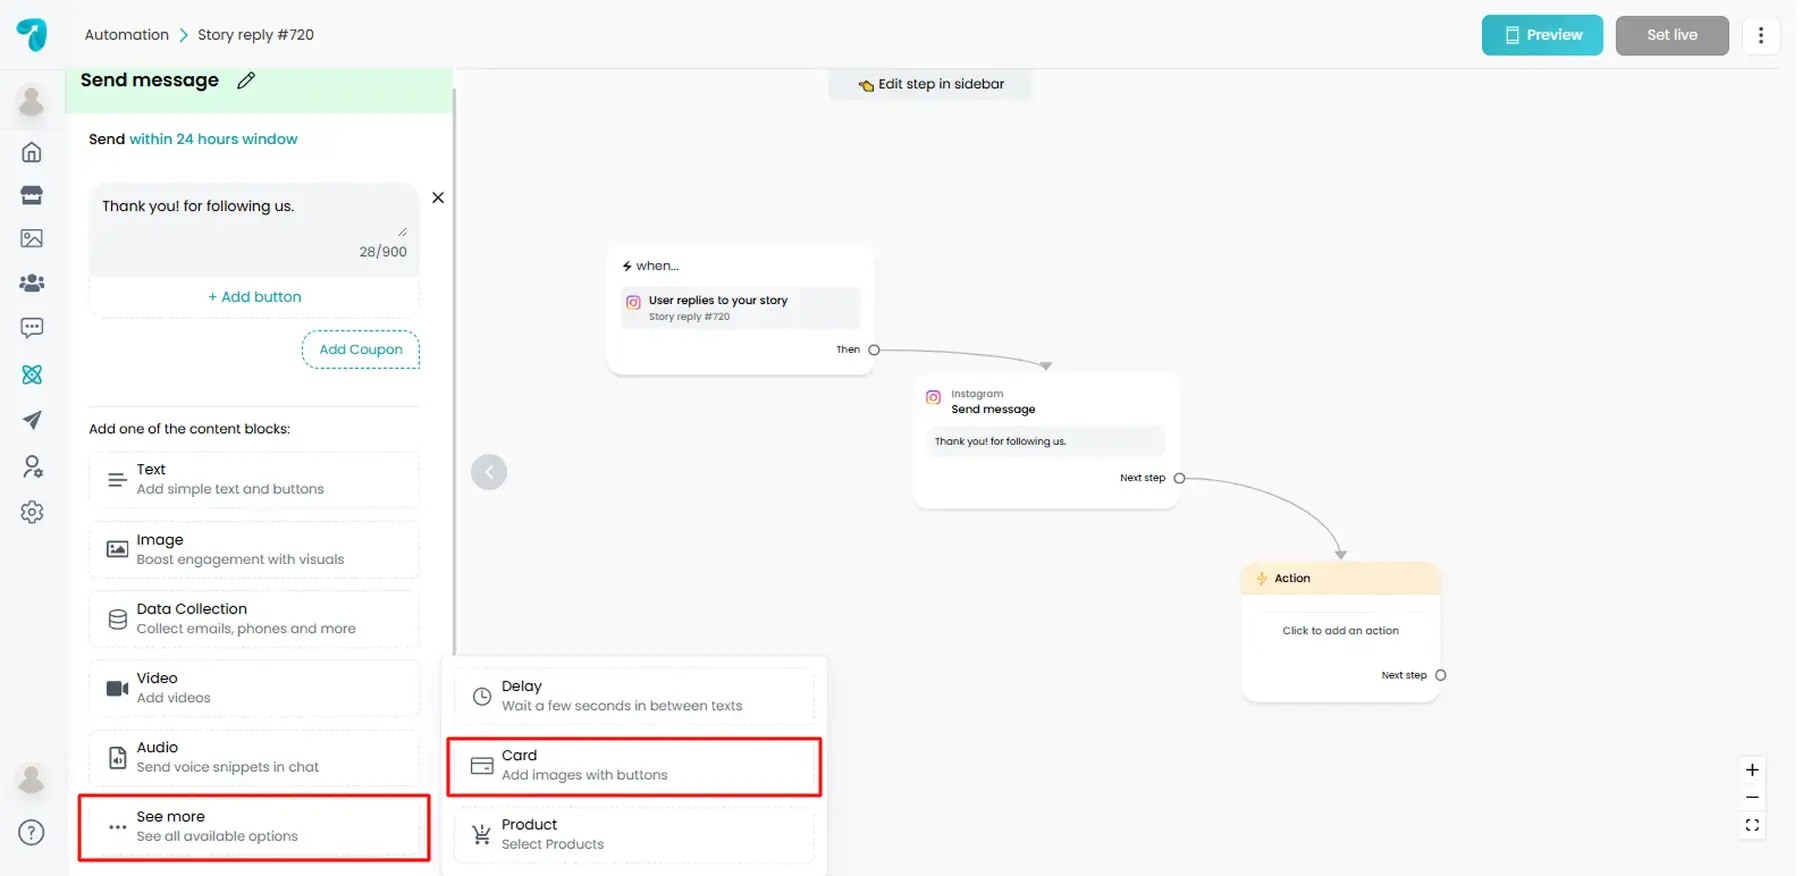
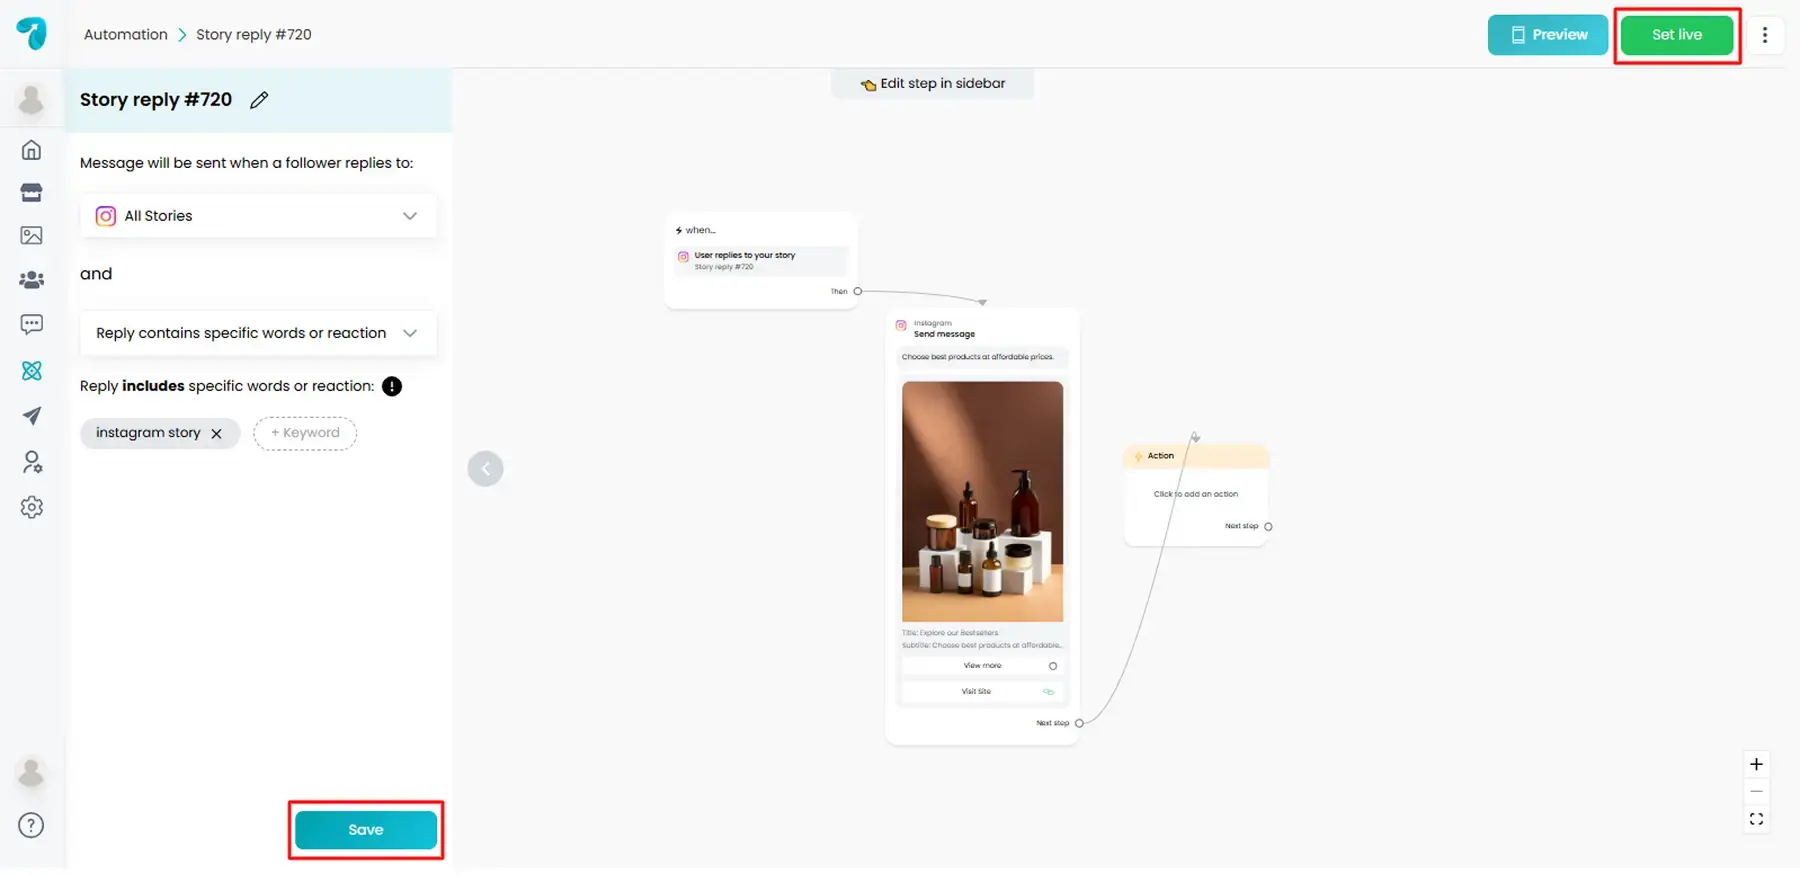
Step 4: Add a Card Block
- In the flow builder canvas, click + Add Block.
- From the block library, choose Card.
- A new Card node appears on the canvas.
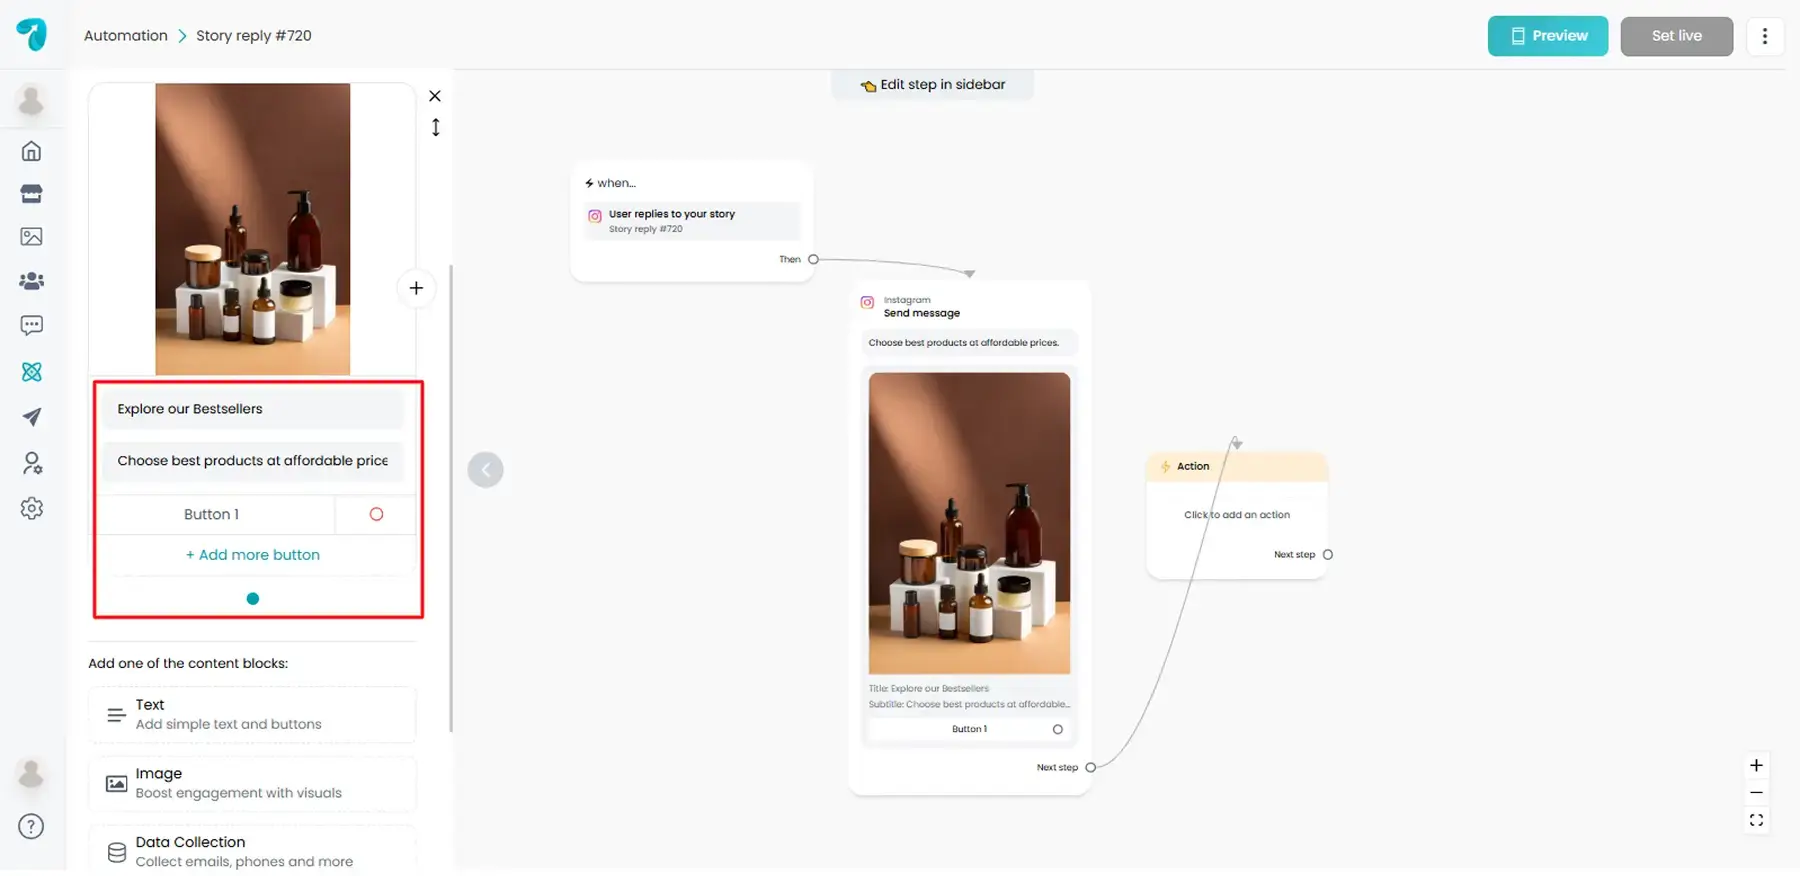
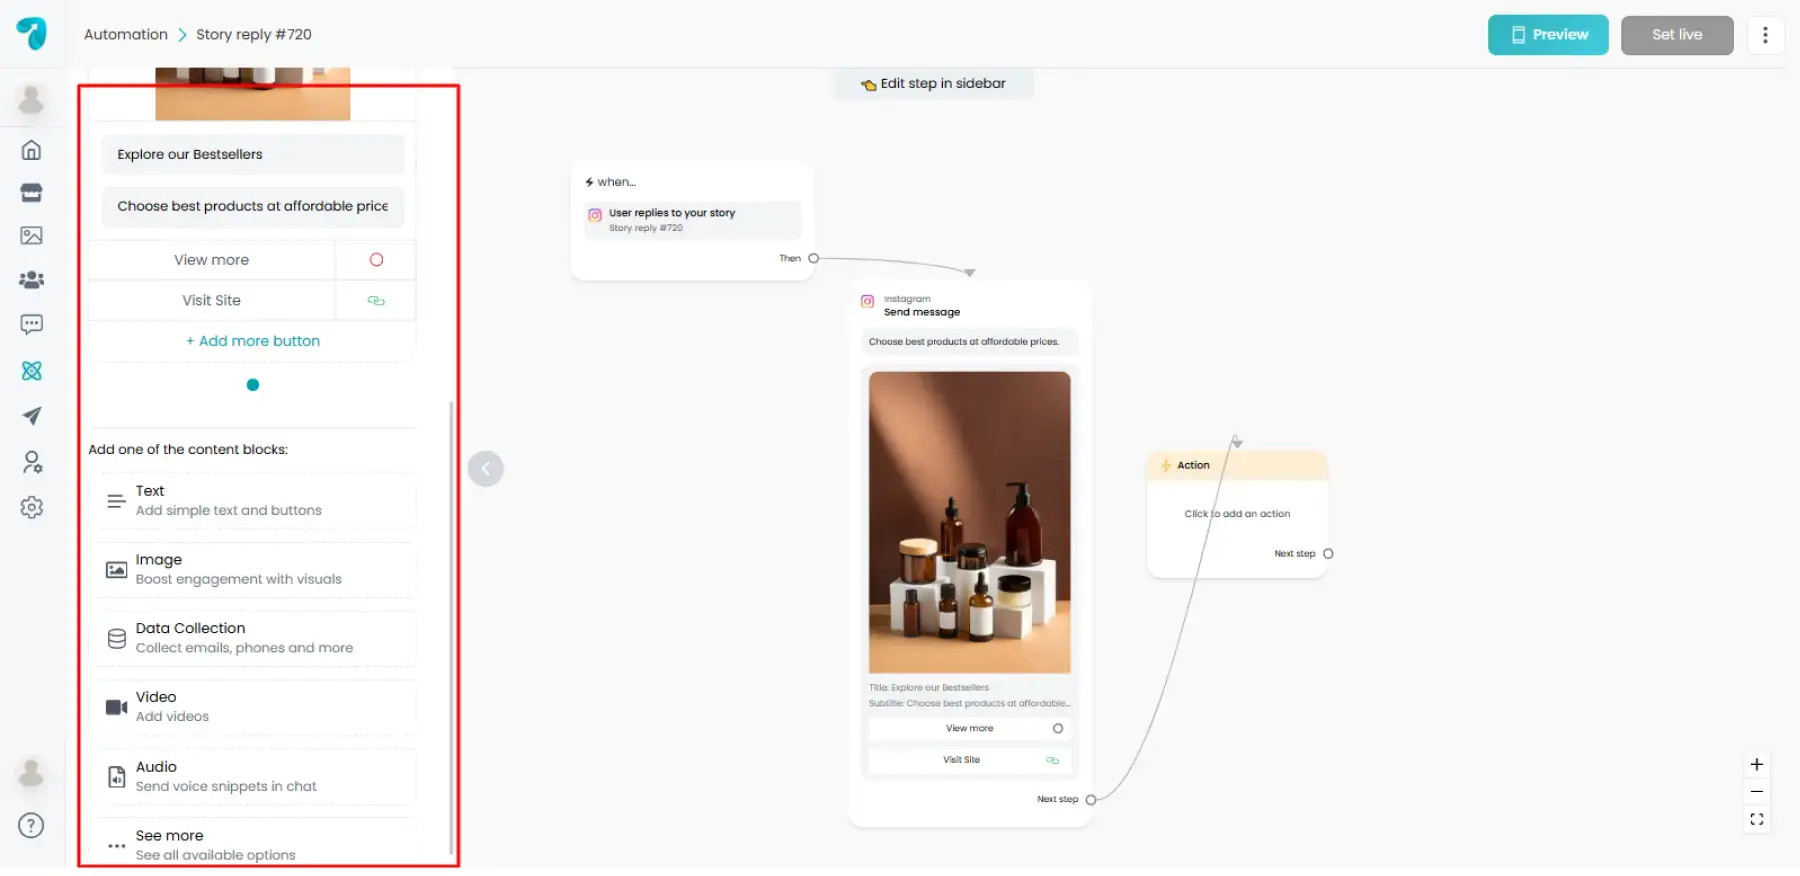
Step 5: Configure Image, Title & Subtitle
Within the Card block editor:
- Image/Picture: Upload or select the image you want to show. Use a clear, high‑resolution visual.
- Title: Add a concise, compelling title (e.g., product name, offer headline).
- Subtitle (optional): Add a short description, benefit, or callout.
Tips
- Keep titles short and action‑oriented (40–60 characters works well).
- Use subtitles to add one strong benefit or detail—avoid long paragraphs.
- Choose images with high quality.
Step 6: Add Buttons (and choose actions)
Buttons encourage the user to take the next step. You can add one or more buttons to a card.
- In the Card block, click Add Button.
- Enter the Button Label (e.g., View Details, Buy Now, Learn More).
- Choose a Button Action, such as:
- Open URL/Link: Send users to a website, product page, or signup form. Paste a valid URL.
- Go to Step/Continue Flow: Connect this button to the next step in your automation.
- Trigger another Flow (if available): Route users to a different automation
- .Save your changes.

Step 7: Connect the Card with Other Blocks
Cards play nicely with other content blocks. You can create a richer sequence by connecting the Card to:
- Message: Add a short intro message before the card.
- Delay: Pause for a few seconds before the next step to feel natural.
- Text: Provide additional details after the card.
- Data Collection: Ask for name, email, or any custom field after a button click.
- Video/Audio: Follow up the card with a quick product demo or voice note.
- Products: Link the card to a Products block to show pricing, variants, or checkout links.
How to connect blocks
- On the canvas, drag the connector from the Card block to the next block (e.g., Message, Delay, Text, Data Collection, Video, Audio, Products).
- If a button should lead somewhere specific, open the Button Action and select Go to Step → choose the target block.
- Repeat for additional paths/buttons.
Example (Instagram DM flow)
- Message: “Got it! Here’s today’s special.”
- Card: Image + Title “Summer Hoodie” + Subtitle “Soft. Breathable. Limited.” + Buttons: View Details (to Products), Ask a Question (to Live Chat/Message)
- Delay: 2–3 seconds
- Text: “Need sizing help? Tap Ask a Question.”
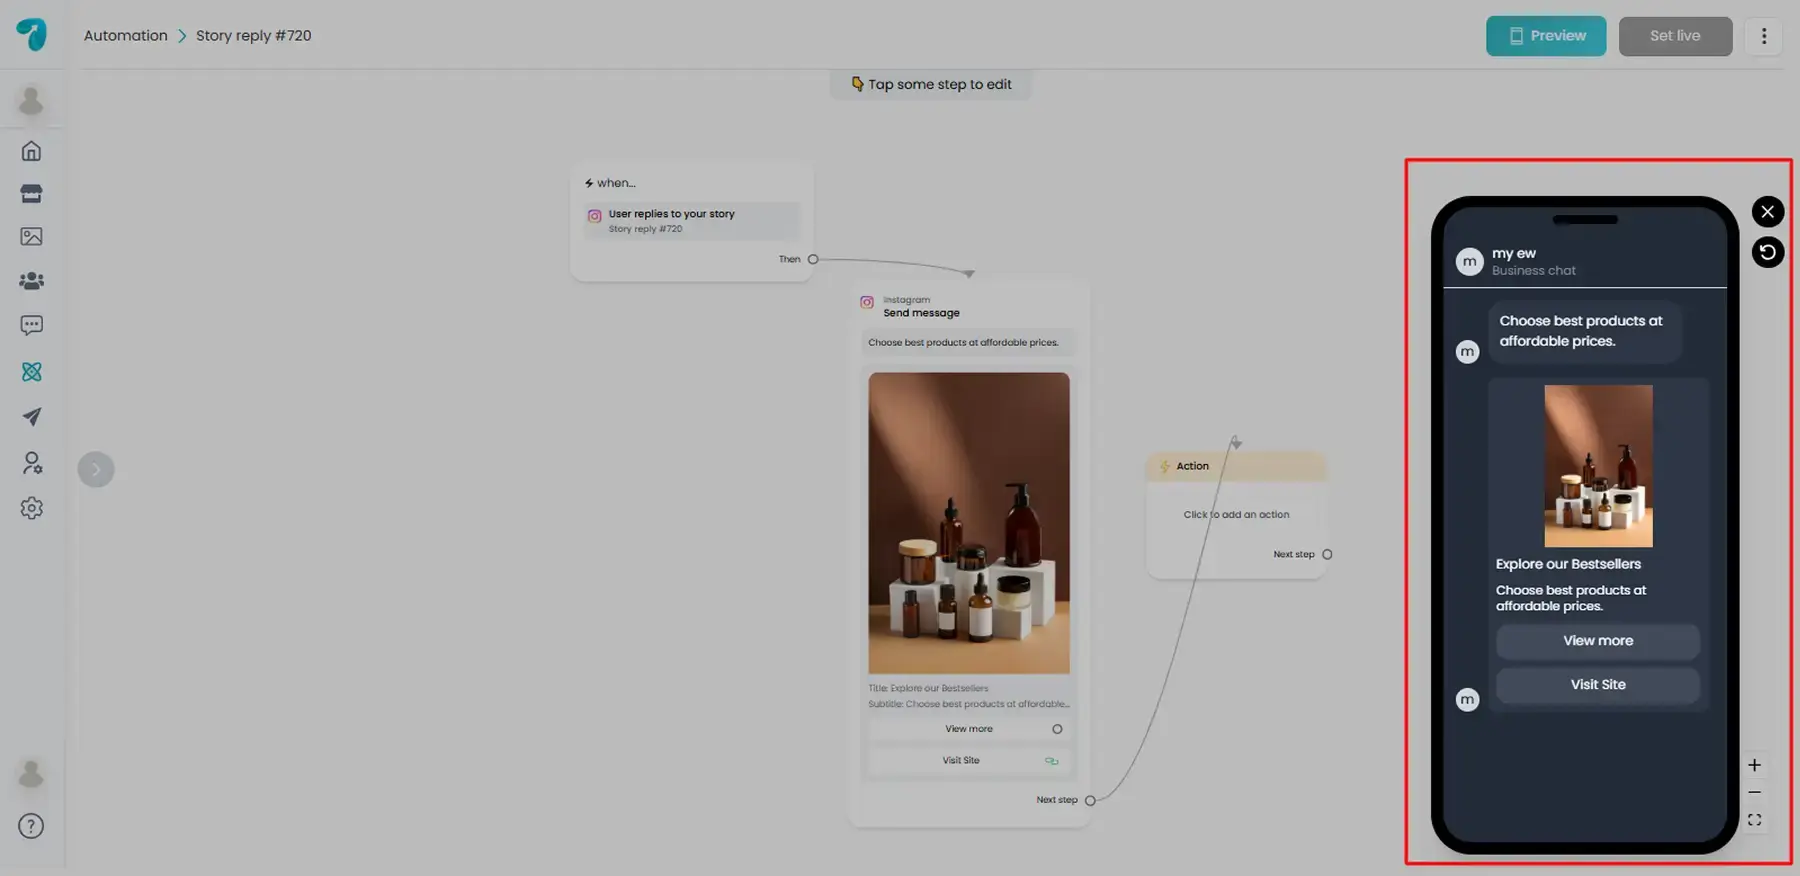
Step 8: Save, Preview & Test
- Click Save in the top‑right (or the flow toolbar).
- Use Preview to send a test to your Instagram/Messenger connected account.
- On your phone, interact with the flow:
- Confirm the image displays clearly.
- Tap each button to verify actions (URLs, next steps).
- Ensure follow‑up blocks (Message, Data Collection, Products, etc.) trigger correctly.
Testing checklist
- All actions are marked by clear labels and valid buttons.
- Links are opened successfully in in-app browsers.
- There are no dead ends (all paths lead to an additional step or to an exit).
Step 9: Publish/Enable the Automation
- Make sure your trigger settings (keywords, story responses, comments, and so on) are configured and you have saved the given changes.
- Click Set Live to make the automation live.
Example Templates You Can Recreate
1. Product Showcase Card
- Image of product + Title Glow Serum + Subtitle Vitamin C 20 percent off today
- Buy Now (click link that opens page to the product), More Info (text block with FAQs)
2. Menu/Services Card
- Image of service -> Title “Free Consult” -> Subtitle “Book in 2 minutes”
- Buttons: Book Now (Link to booking), Ask a Question (Send question—Message—Data Collection)
3. Lead Magnet Card
- Design: Ebook cover -> Title: DM Playbook -> Subtitle > Grab the free guide
- Buttons: Download Guide (Data Collection; alternatively, Send Guide to email)